HDMI over Ethernet box on either side.
$300 per connection: 2 display connections and two USB connections would cost $1200.
https://www.bhphotovideo.com/c/product/1649024-REG/kanexpro_ext_50m18g_4k_18gbps_hdmi_over.html
https://www.avaccess.com/products/u3ex100-usb3-2-extender/
Does this answer your question?
My solution isn't cheap either: 10m USB-C 10gbit: 50€ each(b-stock/customer returns, normally expect to pay 100€), 15m DisplayPort & HDMI: 40€ each.
Total is approx. $200-2500 between cables and building materials.
And more often than not I find myself having to change one thing to wireless
Wireless HDMI is pretty interesting but low quality and high latency. The 60 GHz never took off and wouldn't work anyway as it can't pass through walls.
Wireless USB was a thing with USB 2.0 but it is dead. There was also some 60GHz USB for VR but that also failed in the market.
Water won't get there and if the entire house is flooded and the walls are wet.
Fire protection is up to code.
If you would want to specify this (commercial installation) you likely would need to explicitly allow its use as this shape is not in the ISO/DIN standard.
Data rates and cost:
2x Display connections = 40 gbs
2x USB 3.0 = 10 gbs
=> 50 gbs through a CAT 7 is difficult
OM4 fibre optic is dirt cheap (under $1/m) but the KVMs are expensive at $800.
Using optical thunderbolt cables is also very expensive with $700 for the cable and dock.
UL94 V0 filament is available: PLA, PETG, ABS, PC and probably more.
V0 means stops burning within 10 seconds and no dripping. That's good enough for these applications.
edit: apparently dripping is allowed as long as those aren't flammable. Regardless most V0-rated filaments don't drip as the "charcoal" when exposed to fire.
If you can't buy it, make it: EN25 corner that fits HDMI cables.


Had to fit HDMI & Displayport cables through 25mm/1 inch electrical conduit (building static limits it to 25mm). The issue is that the connector won't fit through the commercial 90-degree corners.
Solution? Enlarge the profile while keeping the bending radius:

Some CAD and a 3D print later I have the solution no money can buy. That's the power of 3D-printing and modeling.


Yes you can:
- enable Arachne in the slicer
- tune the pressure advance setting
That's fair.
$10 retail
approx. $7 for the manufacturer (30% retail)
cost 2x "formular": $3.5
With packaging, this might cost around $3 to make.
for me it is the other way around:
private: Play & mess around. Gathering knowledge/expertise. Modifying/experimenting on a production machine is just not possible.
company/business: Use the knowledge to source (or modify it into) a reliable solution. After all, you are paid to produce good outcomes/results.
Prusa XL is a difficult machine.
On the one hand, it pushes toolchangers to the mainstream. On the other hand, it is utterly unreliable for it's price.
Paying $5k for a printer and then finding out that the printed parts they used deform causing repairs, the heatbed title issues and some more and this is already after a massive delay (launched a few years later than they initially "announced").
The previous goat of toolchangers was the E3D toolchanger. While not perfect it at least had the build quality to match its price point (btw. lower cost than the Prusa XL) and if you fix one minor design oversight they are reliable.
There is no clear answer to what is better.
CoreXY:
- lower moving mass (benefit)
- stationary bed (benefit)
- compact dimensions, easy to build an enclosure (benefit)
- VERY long belts (downside) => you can upgrade to high pitch ball screw and servos (no longer coreXY) => even superior are linear induction motors like those used in pick and place machines but both options would cost significantly more (will never be seen on consumer printer).
bedslinger
- short belts are good for dimensional accuracy
- independent axis makes it easy to get a high rigidity with good dampening characteristics further benefiting the print quality
- bed is moving this is a significant limitation for fragile/tall prints. You can pretty easily simulate the distortion this will cause. To keep it fair: Even with coreXY there will be some forces/drag from the molten material/nozzle to the printed parts.
TL;DR/Opinion?
- CoreXY it is for the consumer market. Those machines look nicer, are smaller and print quality matches expectations.
- For the (ultra) high end it gets blurry. There are outstanding bed slinger options out there made of granite frames, precision linear rails, and so on. These machines aren't designed for high speed but for ultimate reliability and quality with price tages in the $10k+ range for a 200x200mm machine.

This is the base folder of the unzipped update.
differencing: WCH CH341 driver eve: AI chatbot scripts: boring scripts and a binary blob (.elf file: fdm_virtual_device)
Regarding the M9999:
undefined
    else if(strcmp((const char *)rec_cmd[ptr].cmd,"M9999") == 0 )
    {
        ansifo->main_cmd   = SET_AUTO_TEMP_CMD;
        return SET_AUTO_TEMP_CMD;
    }
For M99123 there is only one reference: https://github.com/Raise3D/Klipper-Raise3D-Pro3-Series/blob/97416850a18466eea04865f2c92503501841681c/klipper/klippy/extras/virtual_sdcard.py#L535
I might have the klipper source unzipped from the update file (7 zip noticed that there is more data). Where do I need to check/look for this M99123 implementation?
The update file itself starts with: "RAISE - MXC - PACKAGE...." MXC might stand for STM MXcube as Rais uses an STM32 MCU. Scrolling through the file it looks like it also contains some sort of files for YOCTO-Linux for an NXP chip which might be related to the display.
Also does Klipper still use Python 2.7 and other EOL packages that are 15 years old by now?
Looking at the key-file: It is a gzip which contains a USTAR which contains some sort of, I suppose, key: "RAISE - MXC - KEY _ 'C[....]"
Implementing a G-code that allows abitary code execution sounds like a pretty dumb idea especially since these are "industrial" printers.
But I have to say it kind of looks like some sort of binary blob. What is interesting is that the section "DQafsD84EnC8915R6MD0IpD0Ipw/" is repeating.
Preview images are in a separate .data file.
is this a cloud-first printer? Also totally possible it’s just telling the printer to download something remotely to support that HyperFFF mode
The printer isn't connected to the internet and the hyperFFF works. The HyperFFF upgrade requires a firmware update and a key file that is specific to the machine/serial number. GCode isn't machine-specific.
The underlying software/"firmware" is Klipper.
What’s kinda interesting is someone posted an identical one to the prusa forums like 2 years ago
IdeaMaker is so different meaning it is a good idea to streamline it to Bambu or Prusaslicer. Hardware-wise the Raise is great but sadly this whole slicer situation makes them difficult to integrate/use in a mixed fleet as you need HyperFFF for these machines.
I hope Raise changes their mind and officially supports Prusa or OrcaSlicer soon as they are probably sitting on a sinking ship. Especially now with the Bambu H2D.
Raise3D HyperFFF: M99123
Comparing HyperFFF and "traditional" G-Code for Raise3D machines I noticed that the only difference seems to be the M99123 command at the beginning of the file (identical for different STL-models):
M99123 /RKIIyAfrgVn63QgWjcMv3w/DQafsD84EnC8915R6MD0Ipw/VGrHawCYdCJaNwKoDQafsD84EnC8915R6MD/RKIIyAfrgVn63QgWjcMv3w/DQafsD84EnC8915R6MD0Ipw/VGrHawCYdCJaNwKoDQafsD84EnC8915R6M/RKIIyAfrgVn63QgWjcMv3w/DQafsD84EnC8915R6MD0Ipw/VGrHawCYdCJaNwKoDQafsD84EnC8915R6M/RKIIyAfrgVn63QgWjcMv3w/DQafsD84EnC8915R6MD0Ipw/VGrHawCYdCJaNwKoDQafsD84EnC8915R6MD0Ipw/VGrHawCYdCJaNwKoDQafsD84EnC8915R6MD0Ipw/DQafsD84EnC8915R6MD0IpD0Ipw/VGrHawCYdCJaNwKoDQafsD84EnC8915R6MD0Ipw/DQafsD84EnC8915R6MD0IpD0Ipw/VGrHawCYdCJaNwKoDQafsD84EnC8915R6MD0Ipw/DQafsD84EnC8915R6MD0Ip0Ipw/VGrHawCYdCJaNwKoDQafsD84EnC8915R6MD0Ipw/DQafsD84EnC8915R6MD0Ipw
Any clue how this G-code command works and what is written there?
The restructuring concept includes, among other measures, the complete discontinuation of switch production at the Auerbach site and its transfer to a partner in China.
Is the partner the Zhuhai Cherry Electronics Co. Ltd. or do they plan to outsource switch production?
https://github.com/prusa3d/Prusa-Firmware-Buddy/issues/3333
Introduced in 5.10 and fixed more than a year later in 6.11 (they claim I can't check as I no longer use Prusa).
The print quality is fine if the printer doesn't freeze. Nothing exciting but also not bad for a $100 used device. Still, nothing to ride home about if $200 buys you a new BambuLab A1 mini. In sharp contrast is the Bambulab a reliable and superior printer in every aspect.
With this sad. If you still consider the Prusa Mini:
- DO NOT update the firmware to versions with input shaping! They introduced a bug that you need to remove the SD-card before turning it on or otherwise the printer believes the firmware is damaged/bricked. This bug has been known for quite a long time without any fix from Prusa (present in multiple "stable"/release firmware versions!!!). I got rid of the last Prusa few years ago because of this issue so it might be fixed, might be still broken.
- Do not rely on network connectivity/features. They are unstable meaning the printer needs to be restarted multiple times per day (combine this with the SD-card issue) and might freeze mid-print.
DRM on the resin combined with their high resin pricing is an issue. Heygears ABS-like is close to $90/kg while other ABS like are $25/kg.
Sadly this printer will never be a cost-effective solution with those jacked-up resin prices.
Recomendation?
The buildplate should fit to make it easy to use.
Software subscription and DRM on resin/filament are huge red flags. Had a look at heygears offerings as people describe it as the BambuLab equivalent for SLA. Looking into it, the feels more like a FormLabs company with overpriced resins and DRM to make you buy their resin.
Spending once 1.5-2k€ for the Flex RS printer is fine (more than I would like) but paying 40-70€/kg for resin killed it. Just not possible to economically justify paying twice as much for the source materials (resin). This would mean HeyGear jacking up the production cost by approx. 50-80%, indefinitely. A better option is it spend a day dialing in a third-party resin on the Prusa or Elegoo.
subscription = selling the same software indefinitely
paid upgrades = forced to deliver value/improvements with each paid update
for materials it is similar:
DRM = jacking up prices
open = competing on quality: You could use our first-party product with perfect integration but you are free to source whatever you like
Well, any printer will do that if you calibrate it well enough.
Pain point in the past where the build platform. Prints frequently failed because they would lift from the aluminum plate.
After a lot of trouble, I switched to a flexible buildplate which first was blasted with course "sand" followed by fine glass beans. flexplate so I can remove the print. The course surface makes the print stick but not stick too well. Would like this time to avoid all of this troubleshooting.
Also considered buying one of those printers that work upside down by projecting the light onto the surface and the print is lowered into the resin vat.
“Good” is fairly ambiguous here because what would a “good” slicer look like to you?
Good workflow (UI design), decent automatic support generation, good tool for manually brushing/configuring support material and ideally an elephant foot compensation setting/calibration for the first layer which has a significantly longer exposure time.
Support generation and being able to manually edit those pushed me toward PrusaSlicer.
The VAT tilt is a bit dangerous because of a potential resin leak of the release film, leaking into your printer’s internals
How big of an issue is that? Are there upgrades to seal the printer?
Back in the day, it was more or less a total economic loss for those cheap printers: LCD damaged, UV-array damaged and a complete mess within that was hard to clean.
returning to SLA-resin printing: Which printer, curing station & resin?
Last SLA printer I touched was the original Anycubic Photon with Anycubic cure & wash with Anycubic tough resin. Looking at all the current options I am lost what I should buy. Resin heating, pressure detection, vat tilting and all of this wasn't a thing back than.
With the past experience in mind what printer, curing staton & resin should I get?
for the printer:
First three points have to be fullfiled. The others aspects are more nice to have.
- relaible!!! I want to start a print and return once it is done. Not worrying about print failures
- Works with a good slicer. Back in the day I used PrusaSlicer with UV-tools to convert it to Anycubic fileformat.
- resin vat mixing (vat tilting is good enough) to prevent resins from seperating during long prints
- decently sealed print volume: reducing the vapours/"smell"
- "speed": should be faster than the original Anycubic photon
- build volume: at least 127×80×150 mm. Larger is better (ideally upto 160x160 mm parts)
- network connecti
Duet3D fire hazard. Software issue? (manufacturer doesn't care)
I run half a dozen Duet but one of them started to give me a lot of headaches and only this one (unique hardware + configuration so no other to compare to).
issue: tool head 3 heater is always enabled. The software detects a thermal runaway but the heater stays enabled. The only option to stop the machine from catching fire is to remove the main power.
Hardware:
- Duet 2 wifi
- Due5X
troubleshooting done (hardware):
- measuring the mosfets => good
- checking the driver for obvious issues with a multimeter => no issue found
- moving toolheads hotends around. Issue persists on #3 spot (4th toolhead) so it is unrelated to the tool head. disconnecting it entirely also causes the heater to stay on
- removing the SD-card => issue is gone.
- sometimes it works like it should. Most of the time it doesn't.
- on this particular unit there were some other minor anomalies regarding the WIFI earlier (wouldn't connect to the network) but those fixed themselves after a few rounds of resetting t
NEMA34 upgrade


Upgraded from a NEMA24 to a NEMA34.
Before going out and milling or buying it in metal it is always a good idea to testprint it.
Probably will use the plastic part for a while as 3mm wall-thickness PETG seems might already be good enough.


Is your 3D printer insulated? How is the print chamber heated?


How is the build chamber in your 3D-printer heated? Is there any thermal insulation and if how thick is it?
My two cents:
** thermal insulation**

That's the math for a small 300x300mm printer heated to 70°C (for 130°C tripple this number).
With a 6030 aluminium extrusion a 60mm insulation would fit within the walls and bring down the heatloss to approx. 45W. In other words: Once it is heated up the thermal losses are small enough for it to hold the temperature on its own. Reducing the overall power consumption.
heating/temperature control
For cooling and heating: oil<-> air heat exchanger/radiator might be a good solution:
- place one inside the printer
- the other on the outside
- insert a heater in the loop (only when heating is required, for cooling keep it off)
- possible to push past the 100°C liquid temperature.
Add a fan that circulate
Are you excited about FormNext 2024?


Next week is the FormNext 2024 trade show in FFM. Are you looking forward to visiting it or watching news coverage?
Looking into it I notice that this year there is a noticeable fluctuation. To name one example: Duet3D isn't there this year.
Should I distill IPA (isopropanol alcohol) at home for 3D-printing?
TL;DR No.
What you should do:
- buy fresh IPA. It is approx. $5/L. As such a 2L washing bin is approx. $10 + 10L waste disposal. In the broader picture of total costs and production value, this is manageable (resin cost, machine depreciation, PPE/gloves, ...)!
- use two or three stages of washing
- fill the washing containers with as little as necessary to get it done
- periodically expose the liquid to sunlight and let the particles settle down. Separate the "clean" liquid from the sump (you might add special chemicals to speed up this process).
- if the first stage needs replacement: 1.) responsible disposal of the liquid in compliance with local regulation 2.) move the liquids around: (the third stage is the new fresh liquid, the second is the prior third stage and the second washing station is now the first "dirty" stage).
- check for alternative chemicals that can be used with your particular resin
If you use water-washable resin: IT IS A DANGEROUS LIQUID! Dispose of d
Prusa MK4s launch (TLDR)
Prusa video: https://www.youtube.com/watch?v=VO2MaQrUcqE
TL;DR For those who don't want to watch 10-minute video:
- MK4 to MK4s uprade kit: 109€ + shipping (MK4 customer will receive a voucher (except shipping cost))
- Larger cooling fan
- Improved cooling duct
- high flow nozzle
- NFC for app
- some parts upgraded from PETG to PC-CF
- MK4s still ship without an accelerometer. Prusa claims this isn't needed.
- No camera.
- No upgrades for the Prusa XL in the near future!!!!
other stuff:
- accelerometer board
- GPIO board
Personal Opinion:
This should have been the MK4 to begin with and shows once more how blindsided Prusa was. BambuLab put so much pressure on them that they had to publish the MK4 in the state it is.
Regrading the Prusa XL the trouble continues. This launch/printer has been riddled by issues after issue and now the statement that the improved part cooling won't make it to the XL in the near future.... My guess it that they screwed up with the
Should every printer have a easy to disconnect toolhead?


Quick upgrade for easy to plug and unplug end effectors/toolheads. Activity/status LED are also moved from the back of the printer to the top and some more voltage regulation to provide additional voltage rails.
While a nice connector adds significant cost it is also a big value add for certain 3D-printer. I think more manefacturer should consider tiny details like this when designing their product.
Strain relief isn't installed on this tool for reasons ...

Let's talk about Prusa Printables contests. It might need some fixing.
Currently, Prusa is doing a terrible job with the Printables competition, to the point where they could be in legal trouble if someone were to push for it.
A few examples to prove this statement (5th is in my opinion the worst):
- insect hotel -> canceled due to security concerns. Great work, but why not look into it before you start and provide a design guideline? https://www.printables.com/contest/436-insect-hotels
- Bathtub toys -> Mentioned explicitly: "Safety is our top priority, so make sure your creations are child-friendly, [...]". As these are bath toys, one might assume that they mean safety standards for young children. https://www.printables.com/contest/428-bathtub-toys
Great. Safety is a top priority. So let's see how they moderate it. They haven't... If you scroll through the valid submissions, there are dozens that aren't safe for children. Prusa is EU, so I would expect them to be familiar with the basic EU regulations for children's toys when they say we want sa
How often do you lubricate the linear guides?
I am curious how often do you service the linear rails on the 3D-printer:
- How often do you lubricate them (MGN9 or MGN12)?
- How do you lubricate them?
- What volume of lube do you use?
Nesting capabilities of slicer (overview)
Short overview of how good the nesting capabilities of various 3D slicer are.
The task is simple: placing as many of these shapes on a 200x300mm printed as possible. Manual (quick and dirty for reference): 6 pcs.

Ranking:
- Ultimaker Cura: 7 pcs.
- human (me): 6 pcs.
- Orca slicer: 5 pcs.
- PrusaSlicer & BCN3D stratos: 4 pcs. By switching (for this particular part) from the worst (Prusa) to the best (Cura) slicer the nesting performance improved by a whopping 75%!
Ultimaker Cura:

Prusa:

BCN3D Stratos (forked from an old version of Cura):

OrcaSlicer:

Print in place ratchet design

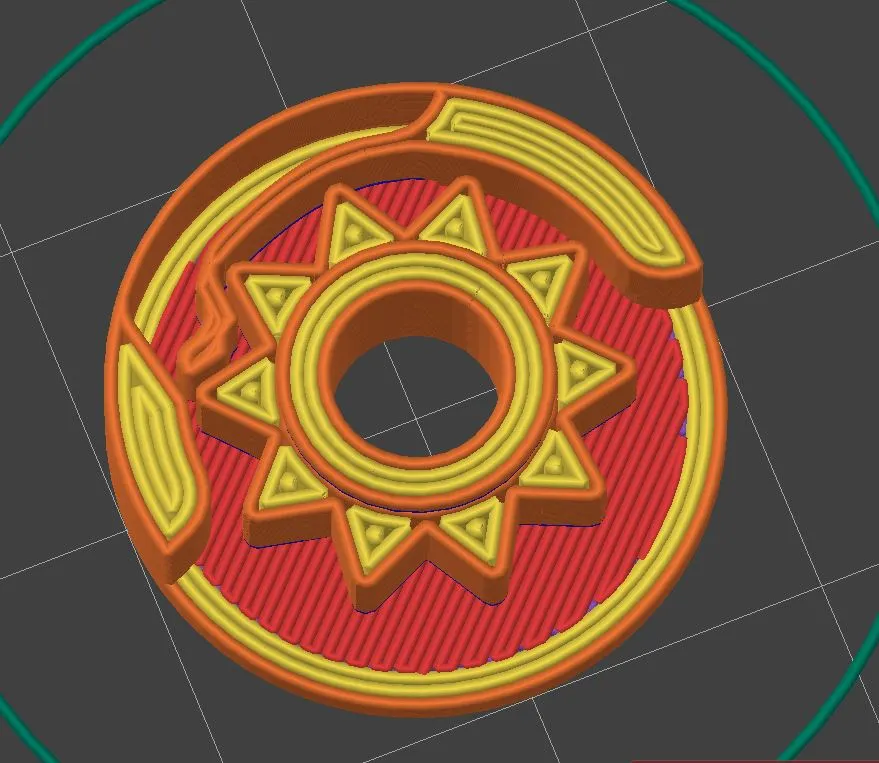
After half a dozen iterations, this was the first reasonably working, acceptable feeling, and good-sounding ratchet mechanism.
allows clockwise rotation blocks counterclockwise rotation
design features:
- allows for a large inner bore (e.g. rotary encoder shaft or 5.2mm screwdriver bit)
- printable with 0.4mm nozzle
- 2cm diameter
- no assembly required. Print in place.
To get a full ratchet: mirror the assembly and add a mechanism/part that pushes one of the springs out. In neutral both leavers are engaged and the ratchet is completely locked.
Btw. Good luck copying it without going through half a dozen of iterations. Going from it barely works to this isn't easy. For my part: Version 5 was working and close to the final design. It took another 10 rounds to get it usable and from there some more to fine-tune it.
Shape optimized spoolholder


Quick and dirty 5 minutes craft: Draw a rough shape, define the contact surfaces & load, click run, and get the optimized shape. The last step is converting the output to a printable shape and running one more simulation to double-check it is strong enough.
This particular holder is a filament spool holder designed to be loaded with up to 5.5kg of filament (1x2.5kg, 3x1kg).
Why do 3D printer manufacturers not get the details right? e.g. rotation indicator on bed levelling wheels
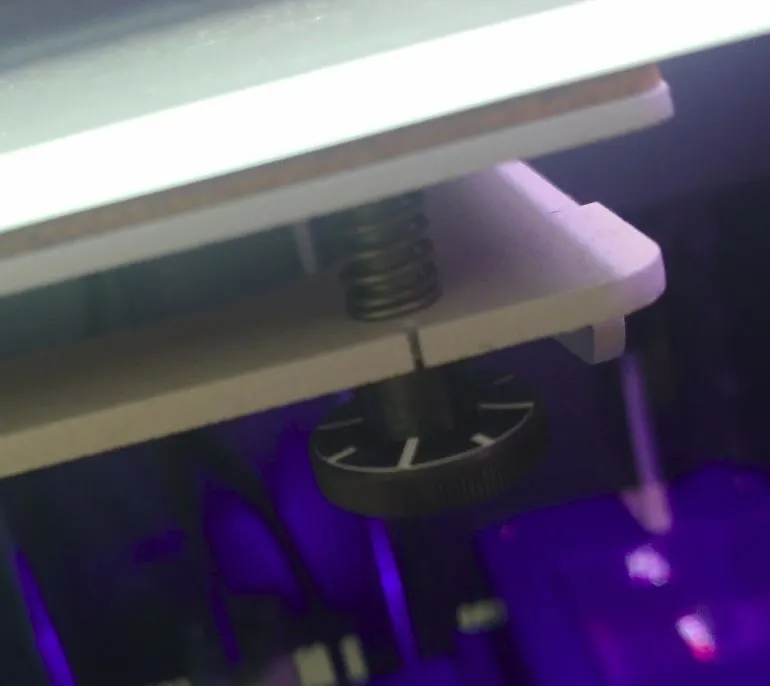
Building a 3D printer is easy. Getting the details right to build a great 3D printer is hard, as this is where most companies fail. Why?
For example, on this printer, the bed is a three-point mount (two wheels for adjustment at the front of the printbed) and the printer's bed levelling dialogue doesn't show the height difference that needs to be adjusted (which most 3D printers do). It does show how much it needs to be turned, and the bed levelling wheels have 1/8th turn indicators, making it easy to get it perfect.
In short, instead of an arbitrary number like 0.3mm that has no meaning to the user, they tell the user to turn this knob 1/4 of a turn. An instruction the user can follow.
** Why is this so outstanding? It doesn't cost much, but it improves the user experience. Are companies blind to these improvements because the engineers are experienced, or is there a lack of testing during development?**
By the way, years ago I did such a fix/modification myself on a Tronxy XY2 pr
For those venturing into 5-axis 3D printing and hybrid manufacturing, what is your tool chain?
With 3D printers like the Open-5x or tool changers (e.g. Prusa XL) both, 5-axis simultaneous 3D-printing as well as hybrid manufacturing (additive followed up by subtractive), is more accessible than they ever were.
For those already venturing into this endeavor: What is your toolchain/software?
Currently, I finish the additive/3D print before running a second gcode for the subtractive part (contact surfaces, threads, ...). This is far from an efficient and powerful process.
Extruder with a cleaning brush (industrial desktop 3D-printer)

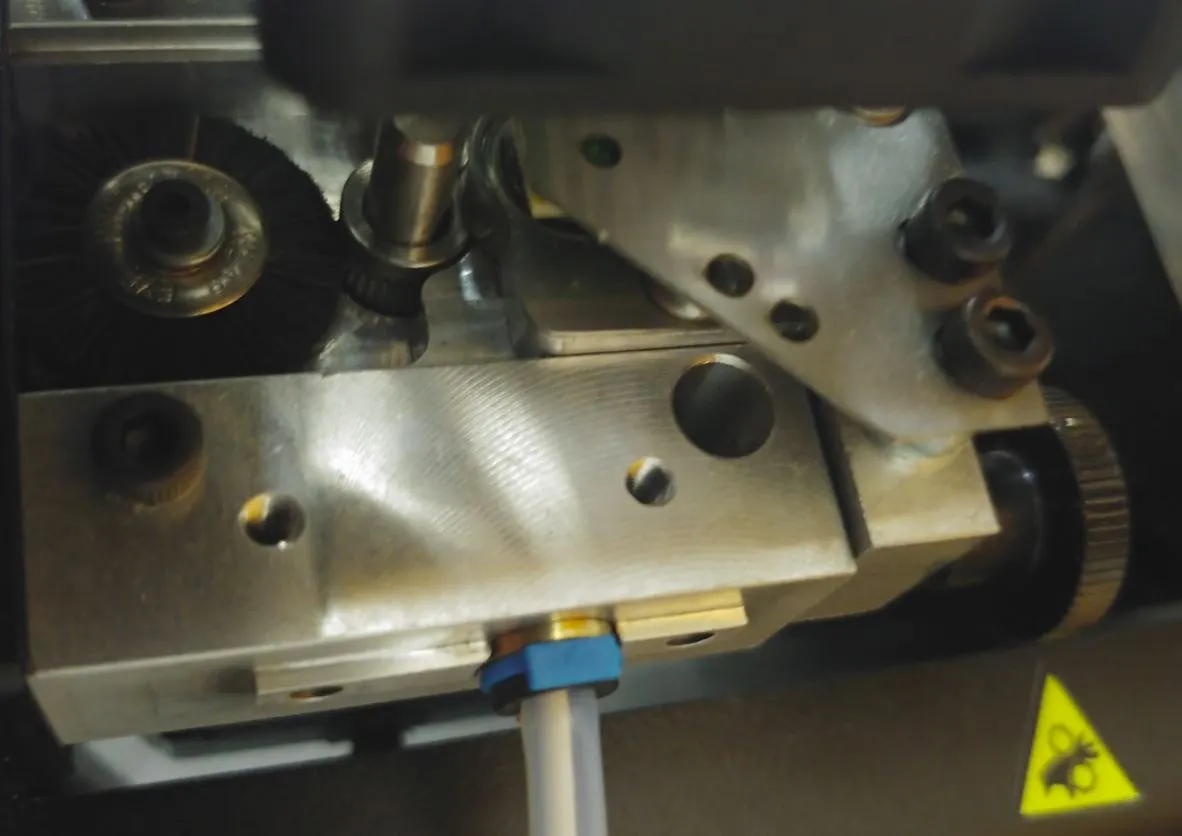
The extruder of the 3Dgence P255 3d-printer features a brush to clean the extruder gear.
One of those permanent temporary fixes.


Needed as soon as possible a spool holder for larger spools so printing anything that is dozens of hours was out of the question.
Solution? Looked at the heavy shelves and had an idea.
One remix later, a 1-hour print and with some round wood that was lying around this spool holder was born.
I like the position of the spool so much that it is here to stay.
How do I fix this Prusaslicer output?

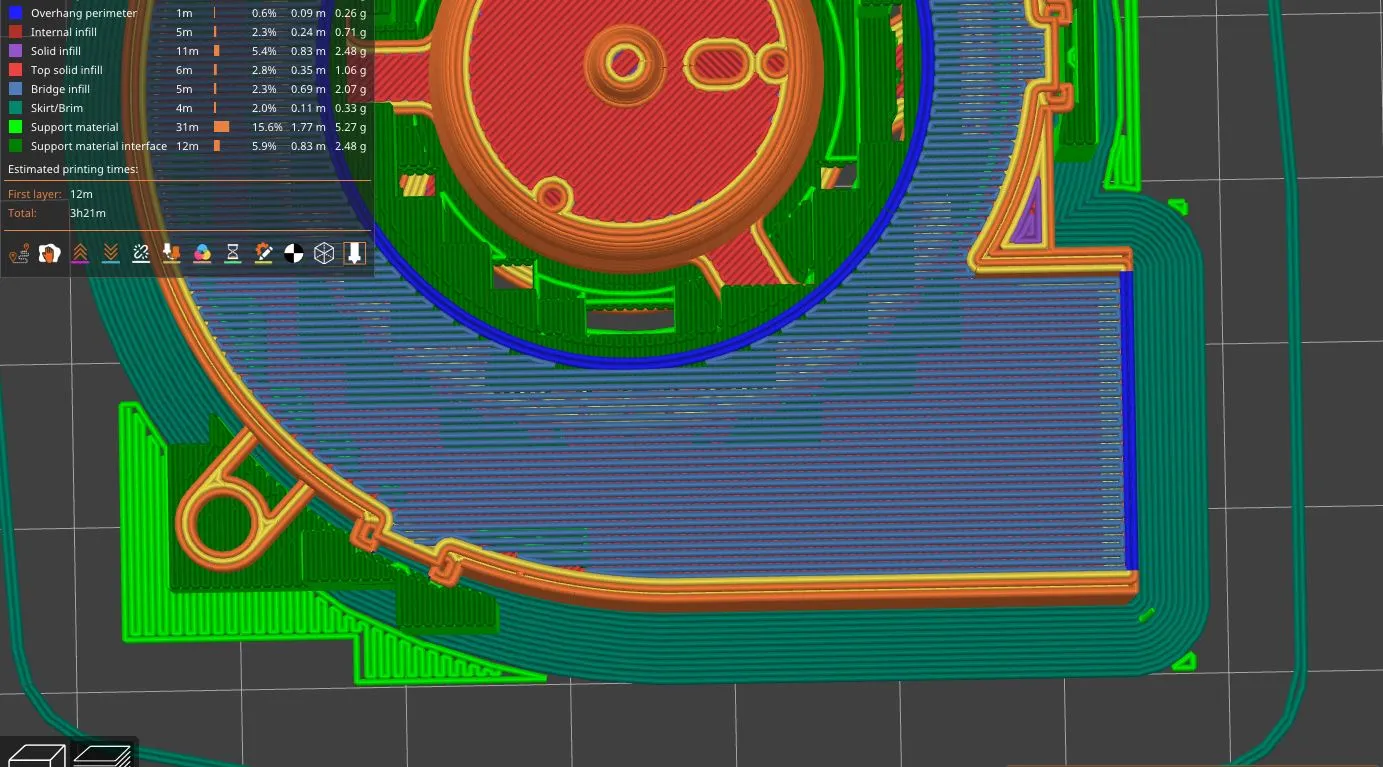
With this particular model, Prusaslicer is very optimistic about bridging and support generation:
- the right side (dark blue) has no support that could help with load-bearing
- the entire layer will be connected to those two lines
- more than 5cm long bridges
I don't think this gcode will successfully print.
How do fix adjust the cura setting to generate a printable output?
The model in question is: https://www.delta-fan.com/Download/3D/BUB0612HJ-00.stp